Testing and Debugging Jupyter Notebooks
Jupyter notebook is a great tool
for a data scientist to create and share documents that contain code,
visualizations, and text. A combination of the notebook development
environment and a
reach Python data-science stack allows to
start with an idea sketch and develop it to a full featured data-science
project. At some point between the sketch and the finished project you may get
that unsettling feeling about changing some function or even a single line of
code, because you are not sure how this may impact the rest of the code. This
is a good moment to invest some time in writing
regression tests (if you
still have not done that). In this post I will show how to use Python standard
testing tools, such as
doctest and
unittest, to add tests to
a Jupyter notebook.
Running Example
As an example, we will use a function that is meant to return the sum of its two parameters and that is stored in a Jupyter notebook cell:
def add(a, b):
    """Return the sum of a and b."""
    sum = a
    return sum
Contrary to the specification, the function returns the first argument and not
the sum of the two arguments. Using
doctest and
unittest modules we will
write tests that will help us to reveal the bug in the function. Then we will
run this tests in a Jupyter notebook and debug the failing tests using the
Python debugger (pdb).
Although, the example is very simple, the techniques that we will use work the same for notebooks of any complexity.
Doctest
The tests of the doctest
module look like interactive Python sessions embedded in the python docstrings.
In the following code snippet we extend our running example with a test that
consists of two lines: a function call (starts with >>>) and the expected output.
def add(a, b):
    """Return the sum of a and b.

    >>> add(2, 2)
    4
    """
    sum = a
    return sum
In the last cell of our notebook, we import the doctest module and run all tests in all docstrings:
import doctest
doctest.testmod(verbose=True)
The test for the add() function will fail, because of the bug, and the test output will look something like this:
Trying:
    add(2, 2)
Expecting:
    4
**********************************************************************
File "__main__", line 4, in __main__.add
Failed example:
    add(2, 2)
Expected:
    4
Got:
    2
1 items had no tests:
    __main__
**********************************************************************
1 items had failures:
   1 of   1 in __main__.add
1 tests in 2 items.
0 passed and 1 failed.
***Test Failed*** 1 failures.
If we remove the verbose=True argument the output will be more concise.
Doctest is very simple to use and suits well for writing simple test cases.
For more complicated test cases Python provides a full featured unit testing
framework unittest.
Unittest
The unittest framework
looks and works similar to the unit testing frameworks in other languages. It
allows for more complex testing scenarios than doctest, but also requires to
write more code.
The following code snippet contains a test case for the add() function. A
test case is created by subclassing unittest.TestCase. A test case contains
one ore more tests that are implemented with methods whose names start with
test. The tests use assert methods to check for an expected result.
import unittest


class TestNotebook(unittest.TestCase):

    def test_add(self):
        self.assertEqual(add(2, 2), 5)
To test a notebook one would write a number of cells with test cases. The very last cell will include the following line of code, which will run all test cases as soon as the cell is executed.
unittest.main(argv=[''], verbosity=2, exit=False)
Running the test case for our example will produce an output similar to this:
test_add (__main__.TestNotebook) ... FAIL

======================================================================
FAIL: test_add (__main__.TestNotebook)
----------------------------------------------------------------------
Traceback (most recent call last):
  File "<ipython-input-3-61dc57f4e00b>", line 6, in test_add
    self.assertEqual(add(2, 2), 4)
AssertionError: 2 != 4

----------------------------------------------------------------------
Ran 1 test in 0.002s

FAILED (failures=1)
We need the argv=[''] argument, because we run the tests from a notebook and not form a command line. exit=False argument prevents unittest from shutting down the notebook kernel. verbosity adjust the verbosity of the output (higher values = more verbose output).
Debugging a Failed Test
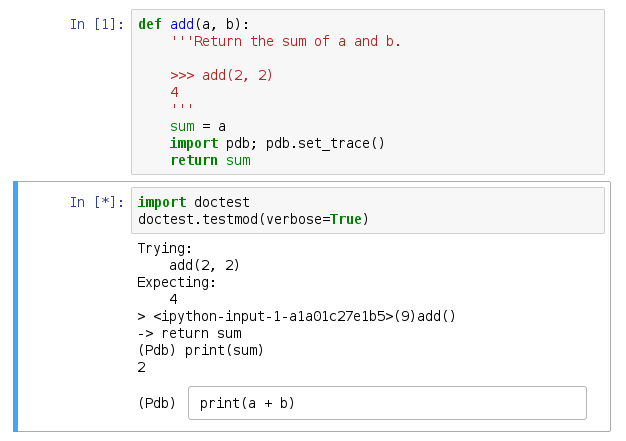
If a test fails it is often useful to halt the test case execution at some point and run a debugger to inspect the state of the program to find clues about a possible bug. For this, insert the following code just before the line at which you want the execution to halt:
import pdb; pdb.set_trace()
For example:
def add(a, b):
    """Return the sum of a and b."""
    sum = a
    import pdb; pdb.set_trace()
    return sum
For this example, the next time you run the test, the execution will halt just before the return statement and the Python debugger (pdb) will start. You will get a pdb prompt directly in the notebook (as shown in the figure), which will allow you to inspect the values of variables, step over lines, etc.

Summary
The standard Python testing modules can be easily used to write tests for
Jupyter notebooks. Doctest is very simple to use and should be used for simple
test cases, while unittest should be used for more complex testing
scenarios. In combination with the Python debugger these testing modules will
help you keep your notebooks bug free.
To start experimenting with the techniques that I have just described you can use this Jupyter notebook.
